Integrating EDIMAX Smart Plug Switch into openHAB2

Many thanks to user “derHeinz” who implemented a new EDIMAX binding for openHAB2, see github. Until now my plug switch SP-2101W was controlled via Android app, therefore I want to integrate it into openHAB2, too:

edimax_concept_slide.PNG

The thing (plug switch) communicates via WLAN in my house. Similarly to Android EdiPlug App we want to switch this module on/off and to get information on current and power consumption.

Prerequisites

Edimax smart plug switch should be already part of the home network. The local IP address is not really requested, but you need the MAC address of the plug switch. My router (Fritzbox) provides this address in list of connected devices.

You need to download the binding from github and copy the jar-file into your openHAB2 addons folder (<conf>/addons). This binding is not shown by PaperUI (it is currently not part of the “official” OpenHAB release), it’s even not shown by “feature:install”. But you can verify the installation with command

bundle:list | grep Edi

Hint: A capital “E” is requested. Here is my result, everything is fine:

edimax_bundle_Karaf

In case of trouble: It is not confirmed by the author, but my observation was that the HTTP binding should be available (either via PaperUI or manually in addons.cfg). May be I’m wrong. Nevertheless,  the “openHAB 1.x Compatibility Layer” is required as it is for all OH1 bindings. The HTTP binding itself may also be an old OH1 binding request.  Just put the “org.openhab.core.compat1x…jar” file to the addons folders as well as the edimax binding jar.

Lets start

Some hints for openHAB(1) configuration are given by “derHeinz”, see readme.


I added in my existing items file (may be you can create a separate one) three items according to above specification:

Switch EdimaxSimple {edimax="801F02FA6BB5:4711"}
Number EdimaxCurrent "Current [%.1f]" {edimax="801F02FA6BB5:4711:CURRENT"}
Number EdimaxPower "Power [%.1f]" {edimax="801F02FA6BB5:4711:POWER"}

For the numbers a formatting rule is given. The interesting part is the binding. Because the binding is not Eclipse Smart Home compatibel, there is no thing and consequently no channel in openHAB2. Therefore we have to use the legacy binding in curly brackets. The long number is the mentioned MAC address you get from your router (or from FHEM 🙂

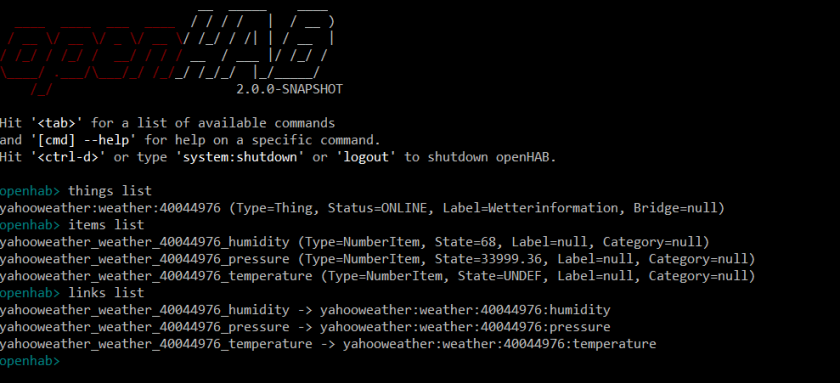
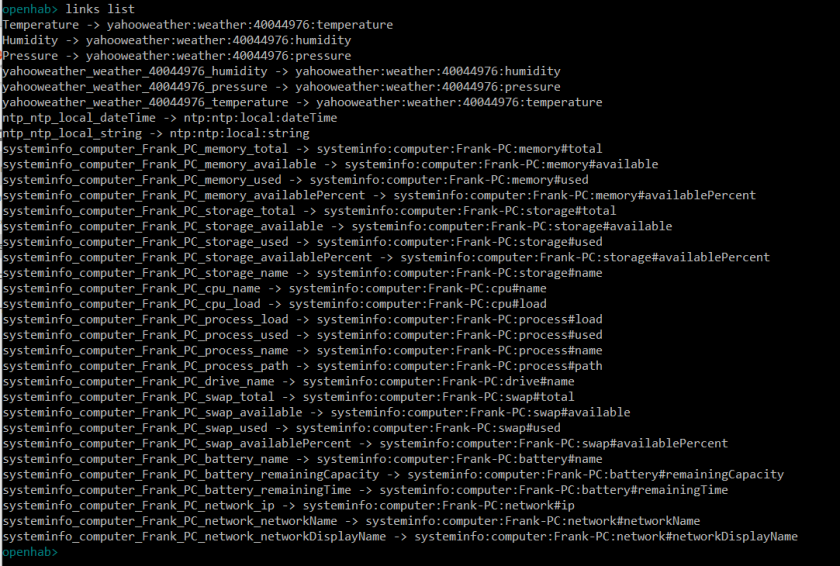
The second part is the password. You can assign a new one (in my case “4711”) with above item definition (or with EdiPlug App) or simply insert the existing password that you assigned by EdiPlug. We can double check the results in Karaf console:

edimax_items

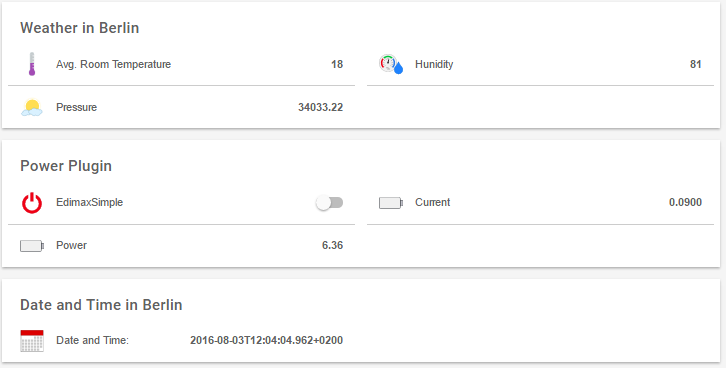
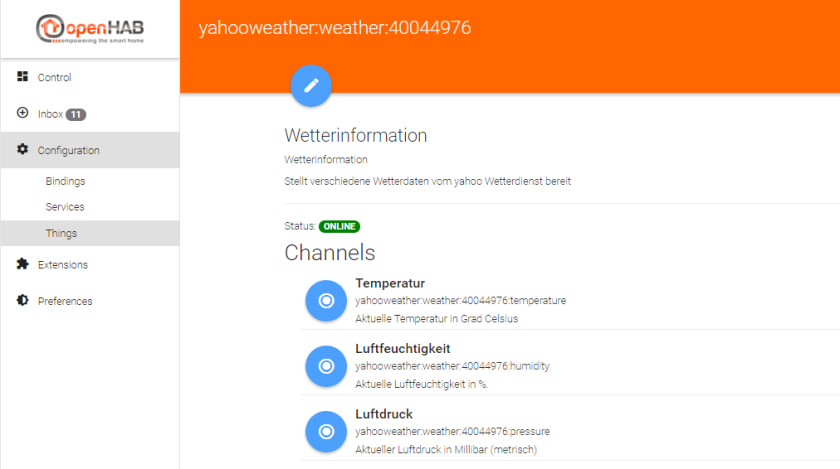
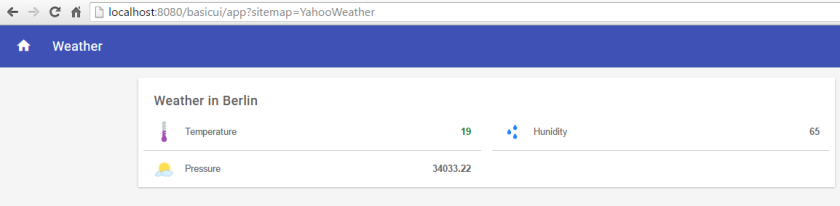
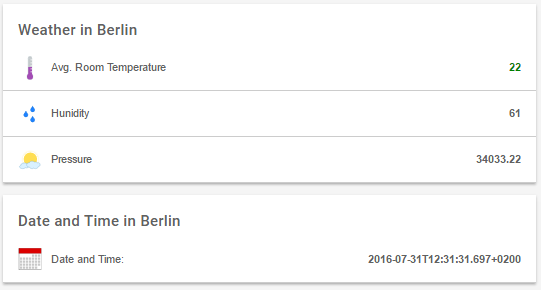
Secondly, the sitemap file should be extended. I added a new frame in the existing sitemap from my article Small examples: Yahoo Weather, NTP and Systems Service.

Frame label= "Power Plugin" { 
       Switch item= EdimaxSimple 
       Text item= EdimaxCurrent icon="battery-50"
       Text item= EdimaxPower icon="battery-50"
 }

The numbers are  shown as Text. Additionally I selected some icons. The result is as expected:

edimax_BasicUI.PNG

Excellent work by the author of the binding. Thanks!

Here you can find a list of my openHAB2 postings.


Small examples: Yahoo Weather, NTP and Systems Service

In previous blog Starting with openHAB2 we introduced the term “Things” – either as a physical device (rollershade, sensor, etc.) or as managable source of information, e.g. internet services or internal services. In most cases these services are used to display some interesting values, e.g. outside temperature from weather service or CPU usage from internal service. In this blog we will handle 3 examples: Yahoo Weather, NTP and Systems Service and learn how to present the data.

InternetServicesSetup

Yahoo Weather

At first we ihave nstall the YahooWeather Binding via PaperUI:

PaperUI -> Extensions -> Bindings -> Yahoo Weather Binding -> Install

Installation of Bindings was already described  in Setup for Mi-Light based on PaperUI.

Check the PaperUI->Inbox or PaperUI-Configuration->Things. By using the Discovery Service the Thing “weather Information” should be automaticallly detected.

YahooThingChannels

There are three channels for temperature, hunidity and pressure. Now we have to configure the thing for your dedicated location, press the blue edit button:

YahooThingsConfiguration.PNG

At “location” you can insert the name of your town. There is another mysterious number in the “Configuration Parameters” part. This this the identification of your area (socalled WOEID). You can get this number from here. For my Berlin area I have to insert 20065696.

You should also fix this information in <conf>/things folder. I created a new file named “YahooWeather.things”  with following content (the second NTP entry is for next example):

yahooweather:weather:berlin [ location="20065696" ]

ntp:ntp:demo [ ntpServer="de.pool.ntp.org", refreshInterval=60, refreshNtp=30 ]

A first view is already available in PaperUI -> Controls:

YahooWeather_ControlPanel

But we want to have our individual view. Therefore we create an items file YahooWeather.items in <conf>/items with following code:

Number Temperature "Temperature [%.1f] °C" { channel="yahooweather:weather:40044976:temperature" }
Number Humidity "Hunidity [%.1f]" { channel="yahooweather:weather:40044976:humidity" }
Number Pressure "Pressure [%.1f]" { channel="yahooweather:weather:40044976:pressure" }

We introduced three numbers containing the values of temperature, humidity and pressure. All of them have the binding/channel information which you can copy from the Things view in PaperUI. Finally, there is some display information – the text and formatting information.

Now we can check if everything ok in Karaf console (see Powerful tools: PaperUI and Karaf):

YahooWeatherKaraf

As expected, openHAB2 repository contains 1 thing, 3 items and 3 channels.

Finally, we define our individual presentation information. This happens in an sitemap file in <conf>/sitemaps (we call the file YahooWeather.sitemap and the sitemap itself YahooWeather, too):

sitemap YahooWeather label="Weather"
{
 Frame label= "Weather in Berlin" {
 Text item=Temperature icon="temperature" valuecolor=[>25="red",>15="green",>5="orange",<5="blue"]
 Text item=Humidity icon="rain"
 Text item=Pressure icon="sun_clouds"
 }
}

We defined one frame (that is a block in presentation view in order to  show our known three values as text information in a group). As a gimmick I introduced a special icon for each item. A complete list of predefined icons can be found here. Furthermore, the temperature value is shown in certain colors that dependend on the current value. here is the result:

YahooWeather_BasicUI

Hints: Sometime i takes a while until the values are catched and displayed. If you have at first a screen without current values – be patient!

Links:

NTP – Time information

Now let’s extend our example by NTP time information. After installing the NTP binding you will see some time later the “Local Time” thing in the Inbox. Press on the blue hook button to take it over (“Add as a thing”). Now we have two things in our list Configuration -> Things:

NTPThings

If there is no connection to NTP server, the binding takes the local computer time.

Items:

DateTime DateT "Date and Time: [%1$tA, %1$td.%1$tm.%1$tY %1$tT]" { channel="ntp:ntp:local:dateTime" }

Something is still wrong, either my network connection (firewall etc.) or … its a beta:

NTPThingsConfiguration

Now, it works:

NTP_ControlPanel

NTP_BasicUI

<to be completed>

System Info

Last, but not least we install PaperUI -> Extensions -> System Info Binding. This service provides us internal computer information about memory, CPU, processes, network etc., see Karaf console (systeminfo links):

System_InfoKarafLinks.PNG

Again, it takes a while until the PaperUI Control panel shows helpful values…

SystemInfo_ControlPanel

<to be completed>


Setup for Mi-Light based on PaperUI

Knowing the basic concepts and tools of openHAB2 from previous blog contributions we are ready now for first setup of real home automatisation project. I have some Mi-Light bulbs in my house, therefore I want to start with these things. You can get the same Chinese hardware under other names: IWYLight, EasyBulb, LEDme, AppLight etc. etc.

I assume that the process described here is likewise for setup of Hue lamps and similar devices.

Use Case

I adapted the first slide for demonstrating our target setup. Let’s start with one RGB lamp.

TermsOpenHAB2_slide04_Milight.PNG

We have two things:

  • RGB lamp
  • MiLight Wifi gateway (this is a bridge)

Fortunally, there is already a binding for Milight implemented by David Graeff , see openHAB2-Milight2 git. The description tells us that the binding provides some channels for DiscoMode too.

Similar to native Milight smartphone app, we want to have following items (control elements):

  • ColorPicker
  • Switch (on/off)
  • slider for brightness

We will use BasicUI for presentation which is indicated in right upper corner.

Prerequsites in openHAB2

At first I decided to clean up my repository. After playing with some demo projects it was wasted with lots of things and items.

In Karaf console (see previous blog contribution) I inserted

  • things clear
  • items clear
  • links clear

(I had to repeat these steps until all elements are cleared, obviously there are same dependencies). With related “list” commands you can verify if the repository is empty.)

Please check that the configuration file <openHAB2 path>/conf/services/addons.cfg   contains

package=standard  (i.e. comment demo line to ignore demo things??)

Next step for preparation is installing the Milight binding. In Extensions- Bindings menu select “Milight Binding version 2.0” to install.

PaperUI_Extension_Miligt

You can check the result in menu Configuration -> bindings:

PaperUI_bindings

By pressing the MORE button the supported things are shown:

Milight_Binding_properties

We are happy that our RGBLed bulb and the Bridge is listed.

Its assumed that your Milight is already integrated into your home network (e.g. for using it with native smartphone app). Else, you have to do it because the Milight Wifi element needs an IP address. Here is a (German) tutorial  In my case the local fix IP address for Milight is 192.168.178.23.

Making Milight things known to openHAB2

The most easy way for integration is the Discovery service. Supply power to Milight Wifi element, switch on your lamp and go to Inbox panel which is empty this moment

InboxEmpty

Click on SCAN button DiscoveryButton and become euphoric!

This is the updated Things view:

Milight_Result_Discovery.PNG

In the Configuration->Things panel we can see our Milight bridge and a lot of supported things.

Hint: There is a flag in <con>/services/runtime.cfg (“autolink”) where you can decide if the detected elements are moved automatically or if you want to have everything under your own control.

The Milight controller supports up to 4 RGB lamps (“Color groups”). Unfortunately the bridge does not know which bulbs are present and the bulbs do not have a bidirectional communication. Therefore all possible bulbs are presented here.

At first we need the bridge and Color group 1 only. The bridge properties are already discovered, just the location, e.g.  “My room” is missing.

Milight_Bridges_Properties.PNG

Now we can edit thing “Color group1”- but even her the bridge was automatically detected and linked. Wow! Its amazing!

Milight_ColorGroup1.PNG

After confirmation of a location we get a view of provided channels:

Milight_Channels.PNG

You can verify this in console with command “things list”. In the moment, the channels are not assigned to any item – you see an hollow white circle in the blue shapes.

Finally, you can go to the “Control panel” and already play with the color. There is an automatically generated control for our lamp and it works perfectly!

Milight_Controls2


In the next blog chapter we will expand this example and create our first sitemap.